You can Turn an Old PSU into a Clean Raspberry Pi Cluster Box.
If you have an unused ATX power supply, you can convert its metal case into a compact enclosure for multiple Raspberry Pi boards. This setup keeps cables tidy, improves airflow, and gives a clean, professional look to your wired projects.
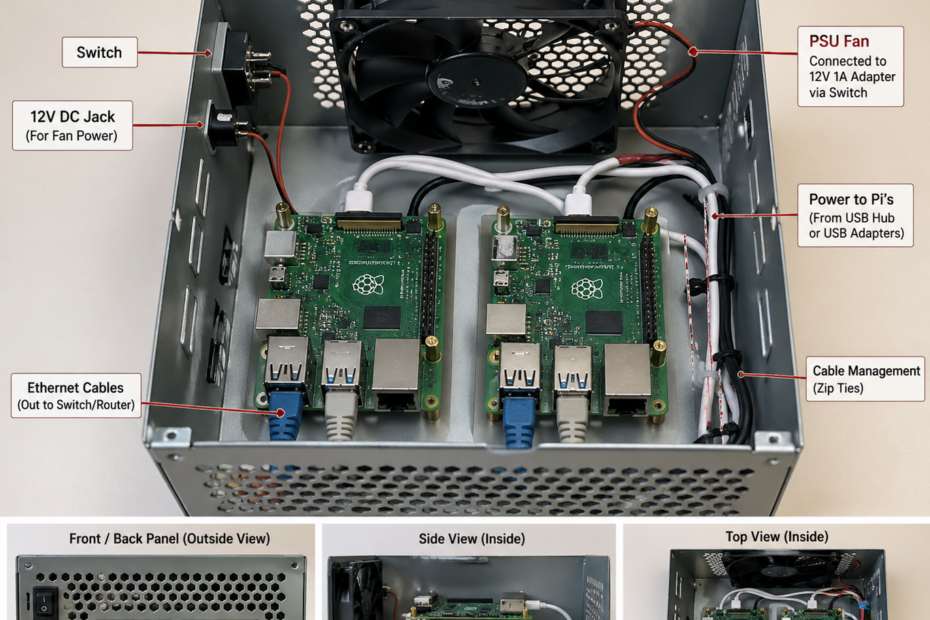
What You Are Building
A small, enclosed “Pi hub” that:
- Houses 2 (even 4) Raspberry Pi boards
- Uses the original PSU fan for cooling
- Routes all Ethernet and power cables neatly through one box
Instead of a messy desk full of wires, you get a single organized unit.
What You Need
- Old ATX PSU case (fully emptied except the Fan, On/off switch and Cable plastic ring)
- 2 – 4 Raspberry Pi
- 12V 1A adapter (for the fan)
- DC barrel jack
- USB power adapters or powered USB hub
- Standoffs or spacers (plastic or metal)
- Zip ties
- Ethernet cables for PIs (if they’re not connected via WiFi)
Step 1: Empty the PSU
Open the PSU and remove all internal electronics. Keep only the metal case and the fan. Do not touch capacitors or internal parts if still present.
Step 2: Reuse the Fan
- The original PSU fan is perfect for airflow
- Connect fan wires to a 12V adapter
- Red with Red cable (positive)
- Black with Black cable (negative or ground)
- Add the switch in series with either black or red cable for manual control
Step 3: Mount the Raspberry Pis
- Install your Raspberry Pis inside the case:
- Use spacers to keep them off the metal surface
- Arrange them so airflow passes across all boards
- Leave some gap between each board for cooling
- Do not let the PCB touch the metal casing directly.
Step 4: Power Distribution
- Never try to power Pis directly from raw PSU wiring unless you know exactly what you are doing.
- Safer option is to use a powered USB hub inside the case
- Or route multiple USB adapters into the enclosure
Goal:
- One clean power input
- Multiple stable 5V outputs to each Pi
Step 5: Cable Management
- Use the PSU’s rear panel for routing:
- Ethernet cables and power cables all can exit through one side
- Keep edges smooth to avoid cable damage. Push cables through the plastic smooth ring hole
- Tie cables inside using zip ties to prevent movement
Step 6: Final Assembly
- Secure all components
- Ensure airflow path is not blocked
- Close the case
- Turn on the fan and power up the Pis.
- You now have a compact Raspberry Pi cluster box.
Warning
Again, do not ignore this: PSU capacitors can retain lethal voltage long after disconnection. Never touch internal circuitry. Only work with a fully cleared and safe enclosure.